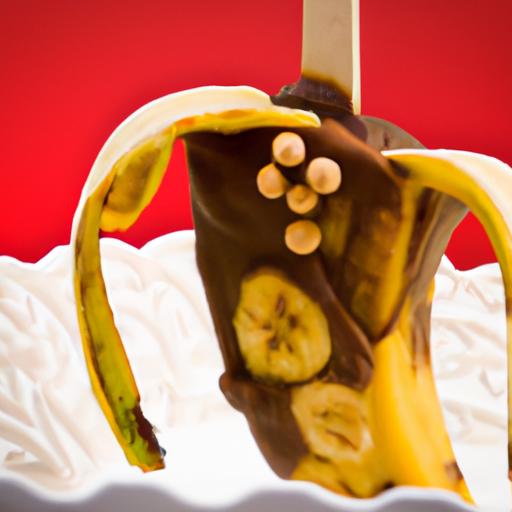
There’s something undeniably magical about the combination of ripe, creamy bananas and luscious, velvety chocolate. When these two come together on a stick, they transform into an enchanting treat that’s as delightful to make as it is indeed to eat. Welcome to the world of Irresistible Chocolate-Covered Banana Pops-a sweet treat that’s perfect for brightening up any day, whether as a refreshing snack, a party favorite, or a fun dessert project. In this guide, we’ll unravel the secrets to crafting these delectable delights, exploring tips, flavor twists, and presentation ideas that will make your banana pops impossible to resist. Get ready to dip into a delicious adventure where simplicity meets indulgence in every bite!
Choosing the Perfect Bananas for Ultimate Sweetness
When crafting irresistible chocolate-covered banana pops, selecting the right bananas is the first step toward sweet success. Opt for bananas that are ripe but not overly soft – ideally,their skins should be yellow with small brown speckles. This stage offers the perfect balance of natural sweetness and firmness, preventing mushy pops while ensuring every bite bursts with sugary flavor. Overripe bananas can become too soft and watery, which affects texture, while underripe ones lack the sweetness needed to complement the luscious chocolate coating.
For an extra touch of decadence, consider using organic bananas to avoid pesticides, especially since these fruits will be enjoyed with their peels removed, making the purity of flavor even more vital. If you’re feeling adventurous, combining regular bananas with the creamier baby bananas adds a subtle twist in sweetness and texture-ideal for impressing friends and family at your next gathering.
Decadent Chocolate Coating Techniques That Wow
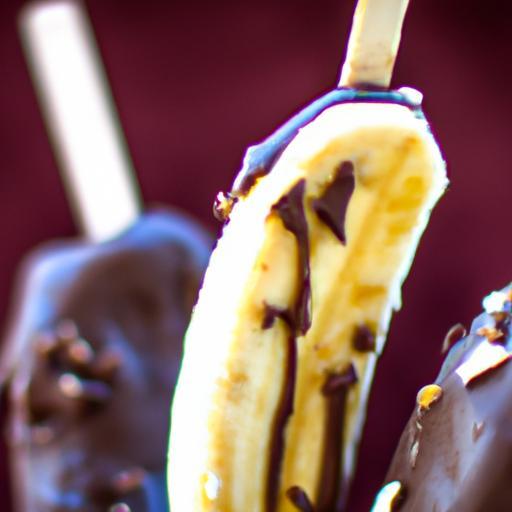
Mastering the chocolate coating is what transforms humble frozen banana pops into a show-stopping treat. Start by selecting high-quality chocolate, ideally 60-70% cocoa for a rich bittersweet balance that pairs beautifully with the banana’s natural sugars. To achieve a smooth, glossy coating, melt the chocolate gently using a double boiler or microwave in short bursts, stirring frequently to avoid burning.
- Prepare your bananas: Slice peeled bananas into 3-4 inch segments and insert sturdy popsicle sticks halfway through.
- Chill before coating: Freeze the banana segments for at least 1 hour so the chocolate adheres perfectly and hardens without melting the fruit inside.
- Dip with purpose: Holding the stick, dip each banana pop into the melted chocolate, using a spoon if necessary to cover evenly.
- Shake off excess: Gently tap the stick on the edge of the bowl to remove drips and create an even layer.
- Double dip for extra crunch: Let the first layer set for 10 minutes, then dip again for a thicker, sturdier shell that snaps with every bite.
- Set on parchment: Place coated pops on parchment-lined trays and sprinkle instantly with your chosen toppings before chilling.
Utilizing tempered chocolate can elevate the finish from matte to glossy with a satisfying snap; however, simple melting with coconut oil can also produce a smooth, luscious coating ideal for home kitchens.
Creative Toppings to Elevate Your Banana Pops
Enhance your chocolate-covered banana pops by adding toppings that provide contrast in both flavor and texture. Here are some inspired options to try:
- Crushed nuts: Toasted almonds, pistachios, or pecans add a delightful crunch and nutty warmth.
- Colorful sprinkles: Use naturally tinted sprinkles or edible flower petals for a festive look that excites kids and adults alike.
- Freeze-dried fruit powders: A light dusting of raspberry or passion fruit powder offers a bright tang that cuts through the richness.
- Sea salt flakes: Just a pinch enhances the chocolate’s depth while balancing sweetness.
- Coconut shreds or cacao nibs: For added texture and a tropical or bittersweet twist.
Mix-and-match these toppings for a beautifully customized treat. Such as, a layer of dark chocolate sprinkled with toasted coconut and flaky sea salt creates an irresistible island-inspired bite.
Tips for Freezing and Serving the Perfect Frozen Treat
The secret to perfect frozen banana pops lies in freezing and serving them just right. After coating and decorating, place the pops on a single layer in the freezer for at least 2 hours to solidify wholly. For best texture, consume within one week to avoid ice crystallization and flavor loss.
When ready to serve,allow the pops to sit at room temperature for 2-3 minutes-this softens the banana slightly,making bites creamy,while the chocolate shell remains satisfyingly crisp. Serve them on a rustic wooden board or colorful platter for eye-catching presentation. Consider adding edible flowers or fresh mint sprigs for an elevated look.
For an exciting variation, serve alongside a small bowl of warm caramel or espresso sauce for dunking, turning simple frozen banana pops into a gourmet experience.
Prep and Cook Time
- preparation: 15 minutes
- Freezing time: 3 hours (includes chilling and setting)
- Total: 3 hours 15 minutes
Yield
Makes approximately 12 banana pops
Difficulty Level
Easy to Medium – perfect for beginners wanting to impress or seasoned home cooks
Ingredients
- 4 ripe bananas, peeled and cut into 3-4 inch segments
- 12 sturdy popsicle sticks
- 8 oz high-quality dark chocolate (60-70% cocoa), chopped
- 1 tablespoon coconut oil (optional, for smoother melting)
- 1/2 cup assorted toppings, such as crushed nuts, shredded coconut, or sprinkles
- Sea salt flakes (optional, to taste)
Instructions
- Insert sticks: Carefully insert popsicle sticks into each banana segment, pushing about halfway through to ensure stability.
- Freeze bananas: Place the prepared banana pops on a lined baking sheet and freeze for at least 1 hour until firm.
- Melt chocolate: Combine the chopped dark chocolate and coconut oil in a microwave-safe bowl. Microwave at 30-second intervals, stirring each time, until smooth and glossy.
- Dip pops: Quickly dip each frozen banana pop into the melted chocolate,rotating to coat evenly. Use a spoon to help cover any missed spots.
- Add toppings: Immediately sprinkle your chosen toppings on the chocolate before it sets.
- Set again: Place the coated pops back on the parchment-lined tray and freeze for 2 hours or until chocolate is firm.
- Serve: Let the pops rest at room temperature for 2-3 minutes before serving for optimal texture.
Tips for Success
- use ripe but firm bananas to avoid mushy centers that won’t hold on to the chocolate well.
- Ensure the bananas are completely frozen before dipping-otherwise, the chocolate may slide off.
- If chocolate thickens while dipping, gently reheat it to maintain a smooth consistency.
- Store finished pops in an airtight container separated by parchment paper to prevent sticking.
- For vegan options,substitute dark chocolate with dairy-free or raw cacao chocolate bars.
serving Suggestions
present these irresistible chocolate-covered banana pops on a bright platter with small bowls of extra toppings like crushed nuts or sea salt flakes on the side. Accompany with a chilled glass of sparkling lemonade or a rich cup of espresso for an indulgent pairing. Garnish with fresh mint or edible flowers for a refined touch that elevates the playful charm of these frozen delights.
| Nutrient | Per Serving (1 pop) |
|---|---|
| Calories | 150 kcal |
| protein | 2 g |
| Carbohydrates | 22 g |
| Fat | 7 g |

For more delicious frozen desserts, check out our Homemade Fruit Ice Pops Recipe. Learn more about the nutritional benefits of bananas on Healthline.
Q&A
Q&A: irresistible Chocolate-Covered Banana Pops – A Sweet Treat Guide
Q1: What exactly are chocolate-covered banana pops?
A1: Imagine ripe bananas transformed into bite-sized icy delights, dipped generously in rich, velvety chocolate, and sprinkled with your favorite toppings-nuts, coconut flakes, or colorful sprinkles. These are chocolate-covered banana pops: simple, fun, and utterly irresistible treats on a stick!
Q2: Why choose banana pops over other desserts?
A2: Besides being incredibly tasty, banana pops strike the perfect balance between indulgence and nutrition. Bananas provide natural sweetness, potassium, and fiber, while the chocolate adds decadence. Plus, they’re speedy to make, customizable, and a cooler option to traditional sweets-perfect for summer or anytime!
Q3: What type of chocolate works best for coating?
A3: For the creamiest coating, go with high-quality dark chocolate or semi-sweet chocolate chips. They melt smoothly and harden with a satisfying snap. Milk chocolate is sweeter and milder, while white chocolate offers a buttery, luscious finish. Some adventurous chefs even mix in a touch of coconut oil to enhance the shine and ease of dipping.
Q4: How do you keep the banana from browning before freezing?
A4: To keep banana pops looking fresh and appetizing, dip each piece in lemon juice or a light brush of orange juice before freezing. The natural acidity slows oxidation, preventing that pesky browning and preserving their bright, happy yellow hue.
Q5: Can I get creative with toppings?
A5: Absolutely! That’s the joy of banana pops-they’re a canvas for your creativity. Crushed nuts, mini chocolate chips, shredded coconut, chia seeds, granola, or even a drizzle of caramel or peanut butter add flavor, texture, and flair. Sprinkle toppings right after dipping so they stick perfectly.
Q6: What’s the easiest way to assemble chocolate-covered banana pops?
A6: Start by slicing bananas into thick coins or halving whole bananas. Insert popsicle sticks halfway through each piece.Freeze them on a parchment-lined tray until firm, about 1-2 hours. Melt your chocolate gently in a double boiler or microwave in short bursts. Dunk each frozen banana pop into chocolate,let excess drip off,then quickly add your toppings before returning them to the freezer for 30+ minutes to set.
Q7: Can kids get involved in making these?
A7: Definitely! Making chocolate-covered banana pops is a fun, hands-on activity that kids love. From inserting sticks, dipping bananas in chocolate, to sprinkling toppings-they’ll feel like little dessert chefs. Just remember to supervise the chocolate melting and the handling of sticks for safety.
Q8: how long do chocolate-covered banana pops last?
A8: Stored properly in an airtight container or sealed freezer bag, these frozen treats can last up to two weeks. For the best texture and flavor, enjoy them within a week. Just pop one out whenever a sweet craving hits!
Q9: Can I make these vegan or allergy-pleasant?
A9: Of course! use dairy-free chocolate alternatives and experiment with nut-free toppings if allergies are a concern. Bananas are naturally vegan and gluten-free, making these pops a versatile treat for many dietary preferences.
Q10: Any tips for the perfect chocolate-covered banana pop?
A10: Use ripe but firm bananas for maximum flavor and food safety. Freeze banana pieces solid before dipping to get that crisp chocolate shell. Work quickly when applying toppings so the chocolate doesn’t harden prematurely.And most importantly, have fun-after all, every pop is a bite of happiness coated in chocolate magic!
Final Thoughts
Whether you’re craving a quick snack or planning a fun dessert for gatherings, these irresistible chocolate-covered banana pops offer the perfect blend of creamy fruit and rich chocolatey goodness. With endless possibilities for toppings and flavors, they’re as versatile as they are delicious. So next time you want to impress your taste buds or delight your guests, grab some bananas, melt that chocolate, and let your creativity pop. Sweet, simple, and utterly satisfying-these frozen treats are sure to become your new go-to indulgence!